Battery switch on travel trailer function is crucial for managing your RV’s power. Understanding how to use your battery switch correctly ensures you have power when you need it, whether you’re connected to shore power or relying on your RV’s batteries. This guide covers the different types of switches, safe connection and disconnection procedures, troubleshooting tips, and essential maintenance practices to keep your system running smoothly.
We’ll explore the intricacies of managing your house and vehicle batteries, covering everything from preventing accidental drain to maximizing battery life. We’ll even delve into the internal workings of the switch itself, providing a clear understanding of its components and wiring. Get ready to become a battery switch expert!
Understanding Battery Switch Functionality in Travel Trailers
Your travel trailer’s battery switch is a crucial component for managing power from your house batteries and your tow vehicle’s battery. Understanding how it works is essential for preventing electrical issues and maximizing your off-grid capabilities. This section will clarify the different types of switches, their purposes, and how to use them safely.
Types of Battery Switches in Travel Trailers
Travel trailers typically use one of two main types of battery switches: a simple 1-2-Both switch or a more advanced switch with an “off” position (1-2-Both-Off). Some higher-end RVs may even incorporate more sophisticated systems with digital controls and monitoring. The choice of switch depends on the complexity of your trailer’s electrical system and your power management needs.
Purpose of a Battery Switch: Managing Power Sources
The primary purpose of a battery switch is to isolate and control the flow of power between your trailer’s house batteries (used for interior lights, appliances, etc.) and your tow vehicle’s battery. This isolation prevents accidental draining of one battery by the other. For instance, leaving the trailer’s lights on with the switch in the “Both” position while disconnected from the tow vehicle will drain the house batteries, not the vehicle’s battery.
The switch allows you to charge your house batteries from the tow vehicle while traveling, and to use the house batteries independently when parked.
Operating a Battery Switch: A Step-by-Step Guide
Proper operation of your battery switch is crucial to avoid electrical problems. Here’s a simple guide:
1. Identify your switch
Locate the battery switch, usually found near the batteries themselves or inside a convenient access panel.
2. Understand the positions
Familiarize yourself with the switch positions: “1” (connects only the house battery), “2” (connects only the tow vehicle battery), “Both” (connects both batteries), and “Off” (disconnects both batteries). Note that not all switches have an “Off” position.
3. Charging the house batteries
While traveling, set the switch to “Both” to charge the house batteries from the tow vehicle’s alternator.
So, you’re planning a trip? Awesome! Before you jet off, remember travel insurance is key. Check out this resource on Aon travel insurance to get a good overview of their plans. Then, compare that with what you find on other sites, like this one covering Aon travel insurance – different sources can offer different perspectives, helping you make the best choice for your needs and budget.
Don’t leave home without it!
4. Using house batteries independently
When parked and disconnected from the tow vehicle, switch to “1” to use the house batteries without draining the vehicle’s battery.
5. Turning off power completely
If your switch has an “Off” position, use it to completely disconnect both batteries to prevent accidental drain and conserve power. This is especially important for extended storage.
Comparison of Battery Switch Types
| Feature | 1-2-Both | 1-2-Both-Off |
|---|---|---|
| Number of Positions | Three | Four |
| Power Control | Controls flow between house and vehicle batteries | Controls flow and provides a complete power-off option |
| Battery Protection | Offers some protection against accidental drain | Offers superior protection, preventing complete discharge |
| Cost | Generally less expensive | Generally more expensive |
Connecting and Disconnecting Batteries Safely
Properly connecting and disconnecting your travel trailer’s batteries is crucial for safety and the longevity of your battery system. Understanding the correct procedures and taking necessary precautions will prevent accidents and ensure your RV’s electrical system functions reliably.Connecting and disconnecting your batteries involves a few key steps, regardless of whether you’re using a battery switch or not. Always prioritize safety by following these guidelines.
Connecting to Shore Power with a Battery Switch
When connecting your travel trailer to shore power, the battery switch plays a vital role in managing power flow. Before plugging into shore power, ensure your battery switch is in the correct position. This usually means having the switch in the “Shore Power” or “Off” position (depending on your specific switch design) to avoid backfeeding from the batteries to the shore power.
Once connected to shore power, your RV’s systems will be powered primarily from the shore power, although the battery switch may allow charging of your batteries. Consult your RV’s and battery switch’s manuals for specific instructions related to your setup. Never assume a default setting; always double-check the switch position.
Disconnecting Batteries for Extended Storage
Before storing your travel trailer for an extended period, disconnecting the batteries is essential to prevent battery drain and potential damage. This involves turning off all 12V appliances, then turning the battery switch to the “Off” position. This isolates the batteries from the RV’s electrical system. For added protection against accidental discharge, consider using battery disconnect switches or even removing the batteries entirely (though this requires some effort and may need tools).
Always consult your RV’s manual for specific instructions on disconnecting your batteries for storage.
Safety Precautions When Working with RV Batteries
Working with RV batteries requires caution due to the potential for explosions and chemical burns. Always wear appropriate safety gear, including eye protection, gloves (rubber or similar), and closed-toe shoes. Ensure adequate ventilation as RV batteries produce hydrogen gas, which is highly flammable. Never work near open flames or sparks. If you smell a strong odor of rotten eggs (sulfur), immediately move away and ventilate the area; this indicates a potential battery failure.
Always handle batteries carefully, avoiding any physical damage. If you are unsure about any step, seek professional assistance.
Flowchart: Switching Between Battery Sources, Battery switch on travel trailer function
The following flowchart illustrates the correct sequence of actions when switching between battery sources (assuming a two-battery system and a three-position battery switch: “Off,” “Battery,” and “Shore Power”). Remember to always consult your specific RV and battery switch manuals for detailed instructions.[Imagine a flowchart here. The flowchart would show three boxes connected by arrows. Box 1: “Connect to Shore Power.” Arrow points to Box 2: “Switch to ‘Shore Power’ position.” Arrow points to Box 3: “Verify Shore Power is supplying power.” A separate branch would show disconnecting the shore power and switching to “Battery” or “Off” positions depending on whether the batteries are to remain connected or not.
A final box would show a confirmation of the action, emphasizing the importance of verifying the correct power source and the safety precautions taken. This textual description should be sufficient to convey the flowchart’s structure and information without an actual visual.]
Battery Switch Maintenance and Upkeep: Battery Switch On Travel Trailer Function
Regular maintenance of your travel trailer’s battery switch and batteries is crucial for ensuring reliable power and extending their lifespan. Neglecting this can lead to premature failure, leaving you stranded without power. A simple, consistent maintenance schedule will pay dividends in peace of mind and prevent costly repairs down the road.Proper care involves both cleaning and inspecting the switch and following best practices for battery health.
This includes regularly checking connections, cleaning corrosion, and monitoring the overall condition of your batteries. By understanding these simple steps, you can significantly improve the longevity and performance of your RV’s power system.
Battery Switch Terminal Cleaning and Inspection
Corrosion on battery switch terminals is a common problem, hindering efficient current flow and potentially causing damage to the switch itself. Regular inspection and cleaning are vital. Begin by disconnecting the batteries from the switch using the appropriate procedures discussed earlier. Then, carefully examine the terminals for any signs of corrosion, which typically appears as a white, green, or blue powdery substance.
Use a wire brush or a battery terminal cleaner to remove any corrosion. For stubborn corrosion, a baking soda and water paste can be effective. After cleaning, apply a thin layer of dielectric grease to protect the terminals from future corrosion and improve conductivity. Reconnect the batteries after ensuring everything is clean and dry. Visually inspect the switch itself for any damage or loose connections.
Maximizing RV Battery Lifespan
Several factors influence the lifespan of your RV batteries. Proper charging is paramount. Avoid deep discharges, as these significantly reduce battery life. Use a multi-stage charger that provides a proper equalization charge periodically to maintain optimal battery health. Regularly check the electrolyte levels in flooded lead-acid batteries, adding distilled water as needed.
Keep the batteries clean and dry, preventing corrosion and ensuring proper ventilation. Store batteries in a cool, dry place when not in use. Consider investing in high-quality batteries designed for RV applications, as they often have improved durability and longer lifespans. For example, AGM or lithium batteries generally offer longer lifespans and better performance compared to traditional flooded lead-acid batteries.
Recommended Maintenance Schedule
| Maintenance Task | Frequency | Notes | Example |
|---|---|---|---|
| Inspect battery switch terminals for corrosion | Monthly | Clean and apply dielectric grease if necessary. | Check terminals before and after each camping trip. |
| Clean battery switch terminals | Every 3 months | Use a wire brush and baking soda paste if needed. | Perform cleaning during seasonal storage preparation. |
| Check battery electrolyte levels (flooded lead-acid only) | Monthly | Add distilled water if necessary. | Check levels after extended use or storage. |
| Inspect battery cables for damage | Every 6 months | Tighten loose connections. Replace damaged cables. | Inspect during pre-season and post-season checks. |
| Perform a full battery charge cycle | Every 3 months | Use a multi-stage charger. | Charge the batteries after a prolonged period of non-use. |
Battery Switch and its impact on different RV Systems

Your RV’s battery switch is the central control for your house batteries, dictating which systems receive power and ultimately influencing how long your batteries last. Understanding how the switch interacts with different appliances is crucial for efficient energy management.The battery switch acts as a gatekeeper, controlling the flow of power from your house batteries to various RV systems. When the switch is in the “on” position, power flows freely, allowing your lights, water pump, refrigerator, and other appliances to function.
In the “off” position, power is completely cut off, preventing accidental drain and protecting your batteries. Some switches offer a “both” or “start” position, allowing you to use both your house and starting batteries simultaneously, often for high-power demands.
Power Draw of Different RV Appliances and Battery Life
Different RV appliances consume varying amounts of power. For instance, a small LED light uses significantly less power than a microwave oven. A water pump draws a moderate amount of power during operation, while a refrigerator, depending on its type (absorption or compressor), can be a substantial power consumer. This variance directly impacts battery life; high-power appliances deplete your batteries much faster than low-power ones.
For example, running a compressor refrigerator continuously for several hours could drain your batteries significantly quicker than using low-power LED lights for the same duration. Consider using power-saving devices and techniques to maximize battery life.
The Battery Switch’s Role in Preventing Accidental Battery Drain
The primary function of the battery switch, besides selecting power sources, is to prevent unwanted battery drain. Leaving your switch in the “on” position while your RV is not connected to shore power can slowly drain your batteries over time, especially if you have appliances drawing power in the background. By switching to the “off” position when not in use, you effectively isolate your house batteries, preventing this drain and ensuring your batteries remain charged for when you need them.
This is particularly important during extended periods of storage or when not connected to an external power source.
So, you’re planning a trip? Awesome! Before you pack your bags, remember travel insurance is key. Check out this resource for info on Aon travel insurance – they often have solid options. Then, to compare and contrast, you might also want to browse some independent reviews on Aon travel insurance to see what other travelers say.
Getting the right coverage can save you a ton of headaches down the line, trust me!
Battery Switch Settings and State of Charge Indicators
The state of charge (SOC) indicators on your RV’s battery monitor or control panel reflect the remaining charge in your batteries. The battery switch settings directly influence the SOC readings. With the switch in the “off” position, the SOC should remain relatively stable, indicating no significant drain. However, if the switch is “on” and appliances are in use, the SOC will decrease over time.
This decrease will be more rapid with high-power appliances. Regularly checking your SOC in relation to your battery switch position helps you monitor your battery’s health and anticipate the need for recharging. For example, a rapid SOC decrease with the switch “on” suggests high energy consumption, possibly indicating a faulty appliance or the need for power conservation.
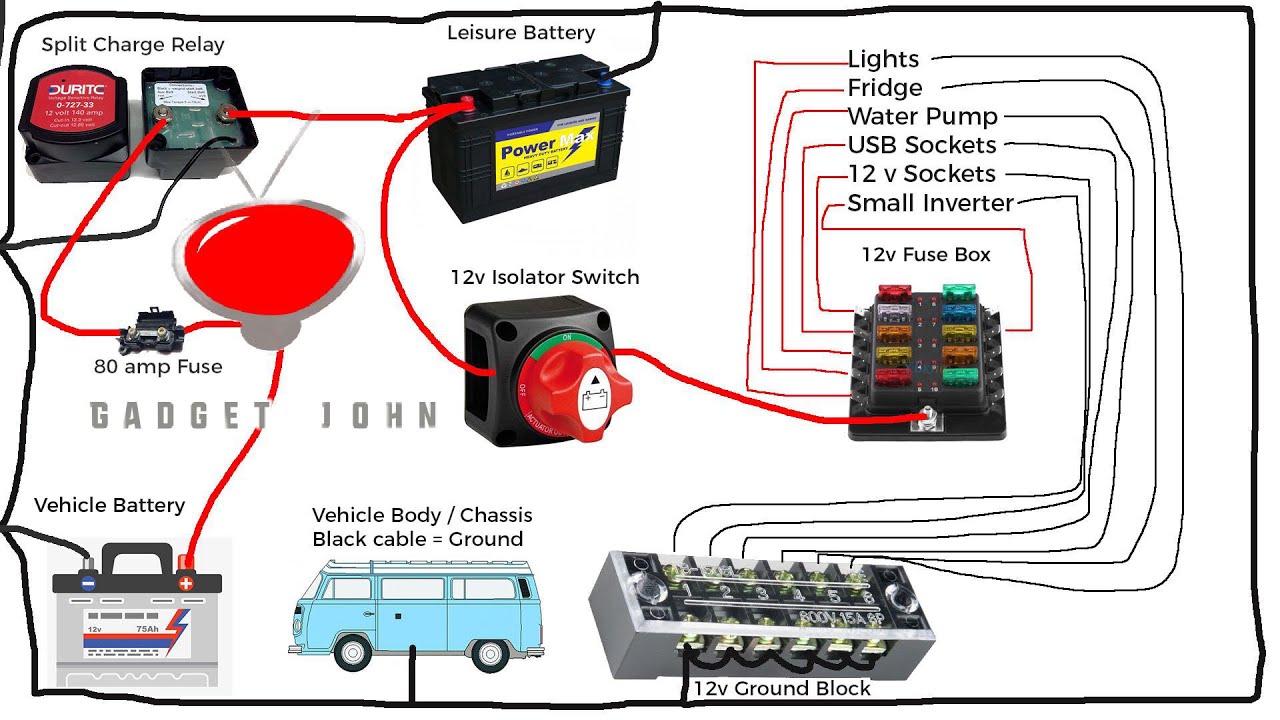
Illustrating Battery Switch Components and Wiring
Understanding the internal workings and wiring of a battery switch is crucial for safe and effective use in your travel trailer. This section will detail the components of a typical switch and provide a visual representation of its wiring, explaining the function of each part.
Most RV battery switches are relatively simple devices, but their proper functioning is vital for managing power in your trailer. A common type is the rotary switch, offering multiple positions to control the flow of electricity between batteries and the RV’s electrical system. Let’s delve into the components and wiring.
Battery Switch Internal Components
Inside a typical rotary battery switch, you’ll find several key components working together. There’s a rotating selector mechanism, usually a cam or a series of contacts, that allows you to choose which battery or combination of batteries are connected to the RV’s electrical system. These contacts are typically made of a durable, conductive material like copper or silver alloy, ensuring reliable connection.
The switch housing itself provides protection and insulation. Finally, there are terminals, typically large screw terminals, for connecting the battery cables. These terminals are designed to securely hold the cables in place, preventing loose connections that can lead to arcing or overheating.
Typical Battery Switch Wiring Diagram
Imagine a diagram with three main terminals: “Battery 1,” “Battery 2,” and “Load.” Each terminal has a heavy-gauge wire connected to it. The “Battery 1” and “Battery 2” terminals connect to the positive terminals of your respective house batteries. The “Load” terminal connects to the positive side of your RV’s main electrical panel. A fourth wire, the ground wire, connects to the negative terminals of both batteries and the chassis of the RV.
The rotary switch itself acts as a selector, controlling the connection between the batteries and the load.
In the “OFF” position, all connections are broken. In the “Battery 1” position, only Battery 1 is connected to the Load. In the “Battery 2” position, only Battery 2 is connected to the Load. In the “Both” position, both batteries are connected in parallel to the Load. This simple diagram illustrates the basic functionality.
More complex switches might have additional terminals or features, but this illustrates the fundamental principles.
Function of Each Wire and Terminal Connection
Let’s break down the function of each wire and terminal:
Battery 1 (+): This thick, heavy-gauge wire carries positive current from your primary house battery to the switch.
Battery 2 (+): This wire mirrors the Battery 1 (+) wire, but for your secondary house battery.
Load (+): This wire carries the positive current from the selected battery(ies) to the RV’s electrical system. It is crucial that this wire is of sufficient gauge to handle the total current draw.
Ground (-): This wire connects the negative terminals of both batteries to the RV chassis. It completes the electrical circuit and provides a return path for current. It’s essential to have a secure and clean ground connection for safety and proper operation.
Wiring Diagram Differences in Various Battery Switches
While the basic principle remains the same, wiring diagrams can differ based on the type of battery switch. Some switches might include additional terminals for accessories, such as a dedicated terminal for a solar charger or an alternator. More sophisticated switches might incorporate features like a voltmeter to monitor battery voltage or an indicator light to show the switch position.
Some switches might be designed for specific battery configurations, such as parallel or series connections. These variations will alter the wiring diagram accordingly, adding more terminals and potentially more complex switching paths. Always refer to the manufacturer’s instructions for your specific switch model.
Mastering your travel trailer’s battery switch is key to a smooth and enjoyable RV experience. By following the safety guidelines and maintenance tips Artikeld in this guide, you can ensure reliable power and extend the life of your batteries. Remember, understanding your system is the first step to preventing problems and enjoying worry-free adventures on the road. So, go forth and power up your RV adventures with confidence!
Clarifying Questions
What happens if I leave my battery switch in the “off” position for a long time?
Leaving the switch off completely isolates both batteries, preventing any drain, even from parasitic loads. However, you’ll have no power to anything in your RV.
Can I use a battery switch with different battery types (e.g., lead-acid and lithium)?
Generally, no. Mixing battery types can lead to voltage mismatches and damage to one or both batteries. Use a switch designed for the specific battery type.
My battery switch is clicking but nothing is working. What could be wrong?
This could indicate a faulty switch, blown fuse, or a problem in the wiring. Check fuses and wiring connections before replacing the switch.
How often should I check my battery switch for corrosion?
Inspect your battery switch terminals for corrosion at least twice a year, or more frequently if you live in a humid climate.
